AVR单片机硬件I2C接口驱动程序
2016-09-23 来源:eefocus
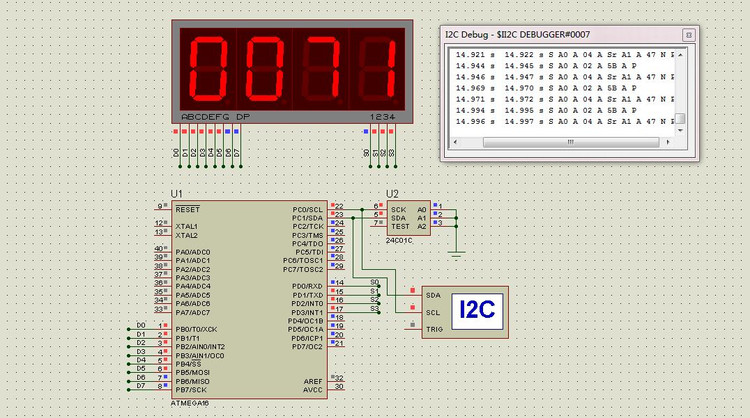
今天上午写了atmega16的I2C硬件接口程序,程序不难,只是给初学的朋友一个思路,不过通过和51的软件模拟I2C程序比较发现,AVR的I2C硬件接口使程序更简单了,

进入单片机查看更多内容>>
程序功能:先由atmega16向EEPROM中某地址写数字71,然后再从EEPROM里读出来显示到数码管上;

#include
#include
unsigned char const duacode[]={0x3f,0x06,0x5b,0x4f,
0x66,0x6d,0x7d,0x07,
0x7f,0x6f,0x77,0x7c,
0x39,0x5e,0x79,0x71}; //0-f 数字模*/
void delay(unsigned int);
void display(unsigned int);
void send1byte(unsigned char address,unsigned char data);
unsigned char read1byte(unsigned char address);
#define START TWCR=BIT(7)|BIT(5)|BIT(2)
#define STOP TWCR=BIT(7)|BIT(4)|BIT(2)
#define WRITE(x) {TWDR=x; TWCR=BIT(7)|BIT(2);}
void main()
{unsigned char i=0;
DDRC=0xff;
while(1)
{
send1byte(4,71);
i=read1byte(4);
display(i);
}
}
void send1byte(unsigned char address,unsigned char data)
{
START;
while(!(TWCR&0x80));
WRITE(0xa0);
while(!(TWCR&0x80));
WRITE(address);
while(!(TWCR&0x80));
WRITE(data);
while(!(TWCR&0x80));
STOP;
delay(2);
}
unsigned char read1byte(unsigned char address)
{
unsigned char temp;
START;
while(!(TWCR&0x80));
WRITE(0xa0);
while(!(TWCR&0x80));
WRITE(address);
while(!(TWCR&0x80));
START;
while(!(TWCR&0x80));
WRITE(0xa1);
while(!(TWCR&0x80));
TWCR=BIT(7)|BIT(2);
while(!(TWCR&0x80));
temp=TWDR;
STOP;
return temp;
}
void display(unsigned int dat)
{
unsigned char a[4],i;
for(i=0;i<4;i++)
{
a[3-i]=dat%10;
dat/=10;
}
DDRB=0xff; DDRD=0xff;
for(i=0;i<4;i++)
{
PORTB=duacode[a[i]];
PORTD&=~BIT(i);
delay(10);
PORTD|=BIT(i);
}
}
void delay(unsigned int x)
{
unsigned int a; unsigned char b;
for(a=x;a>0;a--)
for(b=100;b>0;b--);
}
下一篇:AVR熔丝位的配置
相关文章
- 基于 Microchip AVR DA MCU 的带加热 HoD 离手检测+触摸多功能方向盘方案
- Microchip推出AVR® DU系列USB单片机,支持增强型代码保护和高达15W 的 功率输出
- 贸泽电子开售面向工业和汽车应用的Microchip Technology AVR64EA 8位AVR MCU
- AVR32 MCU上的ABDAC外设音频播放设计
- 使用AVR微控制器控制GSM模块实现发送和接收短信
- 如何使用USBASP烧写器和Atmel Studio 7.0对AVR微控制器进行编程
- 使用AVR微控制器Atmega16连接伺服电机的方法
- 使用AVR微控制器ATmega16的循迹机器人
- 了解Atmega16 / 32 AVR微控制器中的脉冲宽度调制(PWM)
- 如何使用AVR微控制器ATmega16连接霍尔传感器


