


unity在stm32上的使用
2024-01-10 来源:elecfans
按照本文的描述,应该可以在你所处的硬件上跑通代码。
先决条件:装有编译和集成的开发环境,比如:Keil uVision5。
板子硬件要求:无,芯片自带的串口功能即可完成。
源码获取
Unity 是一个轻量级的 C 语言单元测试框架,它的设计理念是简单易用。 Unity 支持测试套件和测试用例,同时提供了丰富的断言函数,包括比较、异常和日志等。
源码入口:
GitHub - ThrowTheSwitch/Unity: Simple Unit Testing for C
https://github.com/ThrowTheSwitch/Unity/

源码里面结构,接下来准备一个stm32的基础工程,把相关代码移植进去。
基础工程
使用STM32CubeMX配置stm32的基本配置。 基本的配置如下:开启swd调试,开启外部时钟,开启串口

时钟界面选项卡:

工程选项卡:

点击右上角的的生成代码:

使用keil打开工程,编译工程,一切都是ok

开始移植
在工程中,新建Unity文件夹,将源码添加进根文件,然后添加进工程,并设置对应的编译路径,其中test_unity_conde.c是我自己新建的内容。


设置头文件路径:

在main.c中,添加串口映射代码,使用printf
/* USER CODE BEGIN 4 */
#ifdef __GNUC__
/* With GCC/RAISONANCE, small printf (option LD Linker->Libraries->Small printf
set to 'Yes') calls __io_putchar() */
#define PUTCHAR_PROTOTYPE int __io_putchar(int ch)
#else
#define PUTCHAR_PROTOTYPE int fputc(int ch, FILE *f)
#endif /* __GNUC__ */
/**
* @brief Retargets the C library printf function to the USART.
* @param None
* @retval None
*/
PUTCHAR_PROTOTYPE
{
/* Place your implementation of fputc here */
/* e.g. write a character to the EVAL_COM1 and Loop until the end of transmission */
HAL_UART_Transmit(&huart1, (uint8_t *)&ch, 1, 0xFFFF);
return ch;
}
int fgetc(FILE * f)
{
uint8_t ch = 0;
HAL_UART_Receive(&huart1, (uint8_t *)&ch, 1, 0xffff);
return ch;
}
/* USER CODE END 4 */
编译代码,报错,新建一个自己的test_unity_conde.c源码,添加报错的这两个函数即可编译通过。

main.c中的代码:

unity_config.h内容到位:
/* Unity Configuration
* As of May 11th, 2016 at ThrowTheSwitch/Unity commit 837c529
* Update: December 29th, 2016
* See Also: Unity/docs/UnityConfigurationGuide.pdf
*
* Unity is designed to run on almost anything that is targeted by a C compiler.
* It would be awesome if this could be done with zero configuration. While
* there are some targets that come close to this dream, it is sadly not
* universal. It is likely that you are going to need at least a couple of the
* configuration options described in this document.
*
* All of Unity's configuration options are `#defines`. Most of these are simple
* definitions. A couple are macros with arguments. They live inside the
* unity_internals.h header file. We don't necessarily recommend opening that
* file unless you really need to. That file is proof that a cross-platform
* library is challenging to build. From a more positive perspective, it is also
* proof that a great deal of complexity can be centralized primarily to one
* place in order to provide a more consistent and simple experience elsewhere.
*
* Using These Options
* It doesn't matter if you're using a target-specific compiler and a simulator
* or a native compiler. In either case, you've got a couple choices for
* configuring these options:
*
* 1. Because these options are specified via C defines, you can pass most of
* these options to your compiler through command line compiler flags. Even
* if you're using an embedded target that forces you to use their
* overbearing IDE for all configuration, there will be a place somewhere in
* your project to configure defines for your compiler.
* 2. You can create a custom `unity_config.h` configuration file (present in
* your toolchain's search paths). In this file, you will list definitions
* and macros specific to your target. All you must do is define
* `UNITY_INCLUDE_CONFIG_H` and Unity will rely on `unity_config.h` for any
* further definitions it may need.
*/
#ifndef UNITY_CONFIG_H
#define UNITY_CONFIG_H
/* ************************* AUTOMATIC INTEGER TYPES ***************************
* C's concept of an integer varies from target to target. The C Standard has
* rules about the `int` matching the register size of the target
* microprocessor. It has rules about the `int` and how its size relates to
* other integer types. An `int` on one target might be 16 bits while on another
* target it might be 64. There are more specific types in compilers compliant
* with C99 or later, but that's certainly not every compiler you are likely to
* encounter. Therefore, Unity has a number of features for helping to adjust
* itself to match your required integer sizes. It starts off by trying to do it
* automatically.
**************************************************************************** */
/* The first attempt to guess your types is to check `limits.h`. Some compilers
* that don't support `stdint.h` could include `limits.h`. If you don't
* want Unity to check this file, define this to make it skip the inclusion.
* Unity looks at UINT_MAX & ULONG_MAX, which were available since C89.
*/
#define UNITY_EXCLUDE_LIMITS_H
/* The second thing that Unity does to guess your types is check `stdint.h`.
* This file defines `UINTPTR_MAX`, since C99, that Unity can make use of to
* learn about your system. It's possible you don't want it to do this or it's
* possible that your system doesn't support `stdint.h`. If that's the case,
* you're going to want to define this. That way, Unity will know to skip the
* inclusion of this file and you won't be left with a compiler error.
*/
/* #define UNITY_EXCLUDE_STDINT_H */
/* ********************** MANUAL INTEGER TYPE DEFINITION ***********************
* If you've disabled all of the automatic options above, you're going to have
* to do the configuration yourself. There are just a handful of defines that
* you are going to specify if you don't like the defaults.
**************************************************************************** */
/* Define this to be the number of bits an `int` takes up on your system. The
* default, if not auto-detected, is 32 bits.
*
* Example:
*/
/* #define UNITY_INT_WIDTH 16 */
/* Define this to be the number of bits a `long` takes up on your system. The
* default, if not autodetected, is 32 bits. This is used to figure out what
* kind of 64-bit support your system can handle. Does it need to specify a
* `long` or a `long long` to get a 64-bit value. On 16-bit systems, this option
* is going to be ignored.
*
* Example:
*/
/* #define UNITY_LONG_WIDTH 16 */
/* Define this to be the number of bits a pointer takes up on your system. The
* default, if not autodetected, is 32-bits. If you're getting ugly compiler
* warnings about casting from pointers, this is the one to look at.
*
* Example:
*/
#define UNITY_POINTER_WIDTH 64
/* Unity will automatically include 64-bit support if it auto-detects it, or if
* your `int`, `long`, or pointer widths are greater than 32-bits. Define this
* to enable 64-bit support if none of the other options already did it for you.
* There can be a significant size and speed impact to enabling 64-bit support
* on small targets, so don't define it if you don't need it.
*/
/* #define UNITY_INCLUDE_64 */
/* *************************** FLOATING POINT TYPES ****************************
* In the embedded world, it's not uncommon for targets to have no support for
* floating point operations at all or to have support that is limited to only
* single precision. We are able to guess integer sizes on the fly because
* integers are always available in at least one size. Floating point, on the
* other hand, is sometimes not available at all. Trying to include `float.h` on
* these platforms would result in an error. This leaves manual configuration as
* the only option.
**************************************************************************** */
/* By default, Unity guesses that you will want single precision floating point
* support, but not double precision. It's easy to change either of these using
* the include and exclude options here. You may include neither, just float,
* or both, as suits your needs.
*/
#define UNITY_EXCLUDE_FLOAT
#define UNITY_INCLUDE_DOUBLE
/* #define UNITY_EXCLUDE_DOUBLE */
/* For features that are enabled, the following floating point options also
* become available.
*/
/* Unity aims for as small of a footprint as possible and avoids most standard
* library calls (some embedded platforms don't have a standard library!).
* Because of this, its routines for printing integer values are minimalist and
* hand-coded. To keep Unity universal, though, we eventually chose to develop
* our own floating point print routines. Still, the display of floating point
* values during a failure are optional. By default, Unity will print the
* actual results of floating point assertion failures. So a failed assertion
* will produce a message like 'Expected 4.0 Was 4.25'. If you would like less
* verbose failure messages for floating point assertions, use this option to
* give a failure message `'Values Not Within Delta'` and trim the binary size.
*/
/* #define UNITY_EXCLUDE_FLOAT_PRINT */
/* If enabled, Unity assumes you want your `FLOAT` asserts to compare standard C
* floats. If your compiler supports a specialty floating point type, you can
* always override this behavior by using this definition.
*
* Example:
*/
/* #define UNITY_FLOAT_TYPE float16_t */
/* If enabled, Unity assumes you want your `DOUBLE` asserts to compare standard
* C doubles. If you would like to change this, you can specify something else
* by using this option. For example, defining `UNITY_DOUBLE_TYPE` to `long
* double` could enable gargantuan floating point types on your 64-bit processor
* instead of the standard `double`.
*
* Example:
*/
/* #define UNITY_DOUBLE_TYPE long double */
/* If you look up `UNITY_ASSERT_EQUAL_FLOAT` and `UNITY_ASSERT_EQUAL_DOUBLE` as
* documented in the Unity Assertion Guide, you will learn that they are not
* really asserting that two values are equal but rather that two values are
* 'close enough' to equal. 'Close enough' is controlled by these precision
* configuration options. If you are working with 32-bit floats and/or 64-bit
* doubles (the normal on most processors), you should have no need to change
* these options. They are both set to give you approximately 1 significant bit
* in either direction. The float precision is 0.00001 while the double is
* 10^-12. For further details on how this works, see the appendix of the Unity
* Assertion Guide.
*
* Example:
*/
/* #define UNITY_FLOAT_PRECISION 0.001f */
/* #define UNITY_DOUBLE_PRECISION 0.001f */
/* *************************** MISCELLANEOUS ***********************************
* Miscellaneous configuration options for Unity
**************************************************************************** */
/* Unity uses the stddef.h header included in the C standard library for the
* 'NULL' macro. Define this in order to disable the include of stddef.h. If you
* do this, you have to make sure to provide your own 'NULL' definition.
*/
/* #define UNITY_EXCLUDE_STDDEF_H */
/* Define this to enable the unity formatted print macro:
* 'TEST_PRINTF'
*/
/* #define UNITY_INCLUDE_PRINT_FORMATTED */
/* *************************** TOOLSET CUSTOMIZATION ***************************
* In addition to the options listed above, there are a number of other options
* which will come in handy to customize Unity's behavior for your specific
* toolchain. It is possible that you may not need to touch any of these but
* certain platforms, particularly those running in simulators, may need to jump
* through extra hoops to operate properly. These macros will help in those
* situations.
**************************************************************************** */
/* By default, Unity prints its results to `stdout` as it runs. This works
* perfectly fine in most situations where you are using a native compiler for
* testing. It works on some simulators as well so long as they have `stdout`
* routed back to the command line. There are times, however, where the
* simulator will lack support for dumping results or you will want to route
* results elsewhere for other reasons. In these cases, you should define the
* `UNITY_OUTPUT_CHAR` macro. This macro accepts a single character at a time
* (as an `int`, since this is the parameter type of the standard C `putchar`
* function most commonly used). You may replace this with whatever function
* call you like.
*
* Example:
* Say you are forced to run your test suite on an embedded processor with no
* `stdout` option. You decide to route your test result output to a custom
* serial `RS232_putc()` function you wrote like thus:
*/
/* #define UNITY_OUTPUT_CHAR(a) RS232_putc(a) */
/* #define UNITY_OUTPUT_CHAR_HEADER_DECLARATION RS232_putc(int) */
/* #define UNITY_OUTPUT_FLUSH() RS232_flush() */
/* #define UNITY_OUTPUT_FLUSH_HEADER_DECLARATION RS232_flush(void) */
/* #define UNITY_OUTPUT_START() RS232_config(115200,1,8,0) */
/* #define UNITY_OUTPUT_COMPLETE() RS232_close() */
/* Some compilers require a custom attribute to be assigned to pointers, like
* `near` or `far`. In these cases, you can give Unity a safe default for these
* by defining this option with the attribute you would like.
*
* Example:
*/
/* #define UNITY_PTR_ATTRIBUTE __attribute__((far)) */
/* #define UNITY_PTR_ATTRIBUTE near */
/* Print execution time of each test when executed in verbose mode
*
* Example:
*
* TEST - PASS (10 ms)
*/
/* #define UNITY_INCLUDE_EXEC_TIME */
#endif /* UNITY_CONFIG_H */
test_unity_code.c中的内容:
#include 'unity.h'
#include 'unity_internals.h'
#include
void setUp(void)
{
}
void tearDown(void)
{
}
/*
闰年判断函数
闰年:能被4整除同时不能被100整除,或者能被400整除。
*/
int IsLeapYear(int year)
{
uint8_t flag = 0;
if(((year % 100!=0) && (year % 4==0)) || ( year % 400==0) )
{
flag = 1;
}
return flag;
}
void leapYear(void)
{
TEST_ASSERT_TRUE(IsLeapYear(2020));
TEST_ASSERT_TRUE(IsLeapYear(2000));
}
void commonYear(void)
{
TEST_ASSERT_FALSE(IsLeapYear(1999));
TEST_ASSERT_FALSE(IsLeapYear(2100));
}
// 被测函数
int add(int a, int b) {
return a + b;
}
// 测试函数
void test_add(void) {
TEST_ASSERT_EQUAL(4, add(2, 2));
TEST_ASSERT_EQUAL(0, add(0, 0));
TEST_ASSERT_EQUAL(0, add(-1, 1));
}
// 被测函数
void led_on(uint8_t *gpio_state) {
// 设置GPIO引脚为低电平,点亮LED灯
*gpio_state = 0;
}
void led_off(uint8_t *gpio_state) {
// 设置GPIO引脚为高电平,熄灭LED灯
*gpio_state = 1;
}
// 测试函数
void test_led_off(void) {
// 模拟GPIO引脚的状态
uint8_t gpio_state = 0;
// 调用被测函数之前,检查GPIO引脚为低电平
TEST_ASSERT_EQUAL(0, gpio_state);
// 调用被测函数,并传入一个指针参数,用于修改GPIO引脚的状态
led_off(&gpio_state);
// 调用被测函数之后,检查GPIO引脚为高电平
TEST_ASSERT_EQUAL(1, gpio_state);
}
void test_led_on(void) {
// 模拟GPIO引脚的状态
uint8_t gpio_state = 1;
// 调用被测函数之前,检查GPIO引脚为高电平
TEST_ASSERT_EQUAL(1, gpio_state);
// 调用被测函数,并传入一个指针参数,用于修改GPIO引脚的状态
led_on(&gpio_state);
// 调用被测函数之后,检查GPIO引脚为低电平
TEST_ASSERT_EQUAL(0, gpio_state);
}
// 被测函数
void reverse_string(char *str) {
// 反转一个字符串
int len = strlen(str);
for (int i = 0; i < len / 2; i++) {
char temp = str[i];
str[i] = str[len - i - 1];
str[len - i - 1] = temp;
}
}
// 测试函数
void test_reverse_string(void) {
// 定义一个测试字符串
char test_str[] = 'Hello World';
// 调用被测函数之前,检查字符串内容
TEST_ASSERT_EQUAL_STRING('Hello World', test_str);
// 调用被测函数,并传入字符串参数
reverse_string(test_str);
// 调用被测函数之后,检查字符串内容是否反转
TEST_ASSERT_EQUAL_STRING('dlroW olleH', test_str);
}
void test_unity(void)
{
// UnityPrint('heihei\r\n');
// UnityPrint('\r\n************\r\n');
// 初始化测试注册表
UNITY_BEGIN();
// 运行测试函数
RUN_TEST(test_add);
RUN_TEST(leapYear);
RUN_TEST(commonYear);
RUN_TEST(test_led_on);
RUN_TEST(test_led_off);
RUN_TEST(test_reverse_string);
UNITY_END();
}
实验现象
编译工程:下载进工程,可以在串口助手界面观察到相关日志。

可以在工程中跑一下官方的demo,观察一下实验现象,本文完!
上一篇:第三章 一个LED闪烁
下一篇:RTOS在STM32中的应用
- 六大全新产品系列推出,MCX A微控制器家族迎来创新
- 意法半导体全新STM32C5系列,重新定义入门级微控制器性能与价值,赋能万千智能设备
- 从控制到系统:TI利用边缘AI重塑嵌入式MCU的边界
- 模组复用与整机重测在SRRC、CCC、CTA/NAL认证中的实践操作指南
- 有源晶振与无源晶振的六大区别详解
- 英飞凌持续巩固全球微控制器市场领导地位
- 使用 Keil Studio for Visual Studio Code开发 STM32 设备
- 蓝牙信道探测技术原理与开发套件实践
- LoRa、LoRaWAN、NB-IoT与4G DTU技术对比及工业无线方案选型分析
- Microchip 推出生产就绪型全栈边缘 AI 解决方案,赋能MCU和MPU实现 智能实时决策
-

【TI MSPM0 应用实战】智能小车+工业角度编码器+血氧仪+烟雾探测器!硬核参考设计详解!
-

2022 Digi-Key KOL 系列: 你见过1GHz主频的单片机吗?Teensy 4.1开发板介绍
-

TI 新一代 C2000™ 微控制器:全方位助力伺服及马达驱动应用
-

MSP430电容触摸技术 - 防水Demo演示
-

直播回放: Microchip Timberwolf™ 音频处理器在线研讨会
-

基于灵动MM32W0系列MCU的指夹血氧仪控制及OTA升级应用方案分享
-
1瓦四级调频发射机
-
500W MOS场效应管电源逆变器,12V转110V/220V
-
12V 转 28V DC-DC 变换器(基于 LM2585)
-
红外开关
-
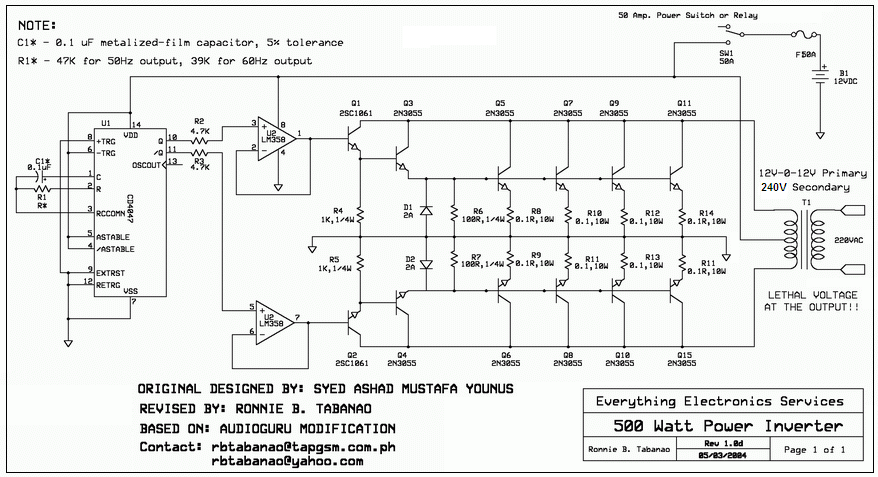
12V转110V/220V 500W逆变器
-
DS1669数字电位器