


喜羊羊系列【设备 - 驱动器 编译进内核】
2025-01-07 来源:cnblogs
*针对不同的平台。可能放进的不是以下的文件内,仅仅做參考
1、头文件
放进:linux-3.0.8archarmplat-samsungincludeplat
led.h
#ifndef _HEAD_H
#define _HEAD_H
#define MAGIC 'h'
#define LED_ON _IOW(MAGIC,1,int)
#define LED_OFF _IOW(MAGIC,0,int)
struct led_device{
dev_t devno;
unsigned int led_major;
struct cdev *led_cdev;
struct class *led_class;
struct device *led_device;
};
#endif
====================================================================================================================================
2、设备文件
方法一:将设备资源直接加进/linux-3.0.8/arch/arm/mach-s5pv210下的mach-smdkv210.c
①
struct platform_device s5pv210_led_device_lhy = {
.name = 's5pv210_led_lhy',
.id = 1,
};
static struct platform_device *smdkv210_devices[] __initdata = {
。。
。。。
。
。。。
。。。
。
。。
。。
。。。
。。。
。。。。
}
②将设备信息加入总线
改动arch/arm/mach-s5pv210/mach-smdkv210.c文件
static struct platform_device *smdkv210_devices[] __initdata = {
...
...
/*加入例如以下代码*/
&s5pv210_led_device_lhy, //新加入的
}
方法二:
①将设备文件dev-led.c 放进 linux-3.0.8/arch/arm/plat-samsung
led_dev.c
#include #include #include #include struct platform_device s5pv210_led_device_lhy = { .name = 's5pv210_led_lhy', .id = 1, }; ②向arch/arm/mach-s5pv210/mach-smdkv210.c(跟平台架构相关文件)加入 static struct platform_device *smdkv210_devices[] __initdata = { .... &s5pv210_led_device_lhy, //新加入 }; ③向linux-3.0.8/arch/arm/plat-samsung/Makefile加入 obj-$(CONFIG_S3C_DEV_LED) += led_dev.o ④向linux-3.0.8/arch/arm/plat-samsung/Kconfig加入 config S3C_DEV_LED bool 'S5PV210 LED driver support' help s5pv210 led device support ⑤加入外部声明arch/arm/plat-samsung/include/plat/devs.h extern struct platform_device s5pv210_led_device_lhy; ==================================================================================================================================== 3、平台驱动 ①将led_drv.c 放进linux-3.0.8/drivers/my_led led_drv.c #include #include #include #include #include #include #include #include #include //下面是移植时须要添加的 #include #include #include #include #include #include static struct led_device *led_drv; static int led_open(struct inode *inode, struct file *file) { printk(KERN_INFO'%s()-%dn', __func__, __LINE__); s3c_gpio_cfgpin(S5PV210_GPC0(3),S3C_GPIO_OUTPUT); s3c_gpio_cfgpin(S5PV210_GPC0(4),S3C_GPIO_OUTPUT); return 0; } static ssize_t led_read(struct file *file, char __user *buf, size_t count, loff_t *offset) { printk(KERN_INFO'%s()-%dn', __func__, __LINE__); return count; } ssize_t led_write(struct file *file, const char __user *buf, size_t count, loff_t *offset) { printk(KERN_INFO'%s()-%dn', __func__, __LINE__); return 0; } static long led_ioctl(struct file *file, unsigned int cmd, unsigned long val) { printk(KERN_INFO'%s()-%dn', __func__, __LINE__); printk(KERN_INFO'cmd=%d arg=%ldn', cmd, val); switch(cmd) { case LED_ON: gpio_set_value(S5PV210_GPC0(val),1); break; case LED_OFF: gpio_set_value(S5PV210_GPC0(val),0); break; default: break; } return 0; } //硬件操作方法 static struct file_operations led_fops={ .owner = THIS_MODULE, .open = led_open, .write = led_write, .read = led_read, .unlocked_ioctl = led_ioctl, }; static int s5pv210_led_probe(struct platform_device *pdrv){ int ret; led_drv = kmalloc(sizeof(struct led_device),GFP_KERNEL); if(led_drv==NULL){ printk(KERN_ERR'no memory malloc for fs210_ledn'); return -ENOMEM; } /*1. 动态注冊/申请主设备*/ ret=alloc_chrdev_region(&led_drv->devno,0,1,'dev_module'); if (ret < 0) { printk(KERN_ERR 'unable to get majorn'); return -EFAULT; goto out_err_1; } //从设备号中分离出主设备号 led_drv->led_major = MAJOR(led_drv->devno); /*为cdev分配空间*/ led_drv->led_cdev = cdev_alloc(); /*注冊硬件操作方法/初始化cdev*/ cdev_init(led_drv->led_cdev,&led_fops); /*注冊字符设备*/ cdev_add(led_drv->led_cdev,led_drv->devno,1); /*2. 创建设备类*/ led_drv->led_class=class_create(THIS_MODULE,'led_class'); if (IS_ERR(led_drv->led_class)) { printk(KERN_ERR 'class_create() failed for led_classn'); ret = -ENODATA; goto out_err_2; } /*3. 创建设备文件*/ led_drv->led_device=device_create(led_drv->led_class,NULL,MKDEV(led_drv->led_major,0),NULL,'led'); // /led/xxx if (IS_ERR(led_drv->led_device)) { printk(KERN_ERR 'device_create failed for led_devicen'); ret = -ENODEV; goto out_err_3; } /*申请GPC0_3,4引脚资源*/ gpio_request(S5PV210_GPC0(3),'LED1'); gpio_request(S5PV210_GPC0(4),'LED2'); return 0; out_err_3: class_destroy(led_drv->led_class); out_err_2: unregister_chrdev(led_drv->led_major,'led_module'); out_err_1: kfree(led_drv); return ret; } static int s5pv210_led_remove(struct platform_device *pdrv){ unregister_chrdev(led_drv->led_major,'led_module'); device_destroy(led_drv->led_class,MKDEV(led_drv->led_major,0)); class_destroy(led_drv->led_class); gpio_free(S5PV210_GPC0(3)); gpio_free(S5PV210_GPC0(4)); kfree(led_drv); return 0; } struct platform_device_id led_ids[]={ [0]={ .name = 's5pv210_led_lhy', .driver_data = 0, }, }; static struct platform_driver s5pv210_led_driver = { .probe = s5pv210_led_probe, .remove = s5pv210_led_remove, .driver = { .name = 's5pv210_led_lhy', .owner = THIS_MODULE, }, .id_table = led_ids, }; static int __devinit s5pv210_led_init(void) { return platform_driver_register(&s5pv210_led_driver); } static void __devexit s5pv210_led_exit(void) { platform_driver_unregister(&s5pv210_led_driver); } module_init(s5pv210_led_init); module_exit(s5pv210_led_exit); MODULE_DESCRIPTION('LED driver for Marvell PM860x'); MODULE_AUTHOR('kiron'); MODULE_LICENSE('GPL'); MODULE_ALIAS('platform:s5pv210-led'); ②在当前文件夹的Kconfig后加入,没有就新建 config S5PV210_LED_DRV tristate 'led_dev for fs210 device' help led driver is for s5pv210, choose y/m/n ③在当前文件夹的Makefile后加入,没有就新建 obj-$(CONFIG_S5PV210_LED_DRV) = led_drv.o ④改动上级文件夹的Makefile和Kconfig 将linux-3.0.8/drivers/Kconfig 加入 source 'drivers/my_led/Kconfig' 将linux-3.0.8/drivers/Makefile 加入 obj-y += mydriver/ 最后就是自己make menuconfig里配置选项了。 ==================================================================================================================================== 4、測试程序编译測试要使用交叉工具连 arm-none-linux-gnueabi-gcc led_test.c -o led_test 附: 将可运行文件增加到开机启动,改动根文件系统filesystem vi filesystem/etc/init.d/rcS ./star_app/led_test 測试程序 #include #include #include #include #include #include #include #include #include #define MAGIC 'h' #define LED_ON _IOW(MAGIC,1,int) #define LED_OFF _IOW(MAGIC,0,int) static void my_sleep(int n){ int j; for(j=0; j<10000000*n; j++); } int main(void) { printf('-------------------------------n' '|| start:一闪一闪亮晶晶 ||n' '-------------------------------n'); my_sleep(1); int fd; unsigned int cmd=0; unsigned long val=0; fd=open('/dev/led', O_RDWR); if(fd<0){ perror('open failed!n'); exit(1); } int i; for(i=0; i<10; i++){ if(i%2==0) cmd=LED_OFF; else cmd=LED_ON; val=3; //亮 led3 if(ioctl(fd,cmd,val)<0){ perror('ioctl failed!n'); exit(1); } val=4; //亮 led4 if(ioctl(fd,cmd,val)<0){ perror('ioctl failed!n'); exit(1); } my_sleep(1); } close(fd); return 0; }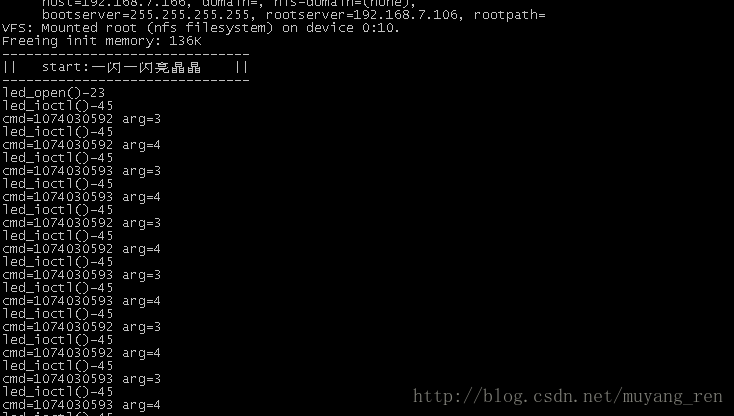
上一篇:gpiolib库详解
- 意法半导体发布75V STSPIN电机驱动芯片,方便用户扩展工业电机驱动器设计
- 意法半导体推出响应快速的隔离式栅极驱动器,让汽车模块变得更小、更安全
- 应对严苛电压瞬态游刃有余,意法半导体智能高边驱动器为汽车系统持续供电与守护
- 意法半导体微型驱动器助力小型家电设计:封装更小巧,布局更灵活
- 尼得科驱动(CT)再度与华友钴业合作 为印尼12万吨镍冶炼项目提供驱动器解决方案
- 英飞凌推出首款带光耦仿真器输入的隔离栅极驱动器IC,支持新一代碳化硅应用
- 意法半导体推出宇航级高速驱动器,支持高速数据传输与低电压逻辑
- e络盟与 Fulham 宣布建立全球分销合作伙伴关系
- MPS发布车规级TFT LCD偏压驱动器MPQ5613D-AEC1
- Melexis推出高度可配置的智能单线圈风扇驱动器,实现系列化扩展
- 六大全新产品系列推出,MCX A微控制器家族迎来创新
- 意法半导体全新STM32C5系列,重新定义入门级微控制器性能与价值,赋能万千智能设备
- 模组复用与整机重测在SRRC、CCC、CTA/NAL认证中的实践操作指南
- 有源晶振与无源晶振的六大区别详解
- 英飞凌持续巩固全球微控制器市场领导地位
- 使用 Keil Studio for Visual Studio Code开发 STM32 设备
- 从控制到系统:TI利用边缘AI重塑嵌入式MCU的边界
- 蓝牙信道探测技术原理与开发套件实践
- Microchip 推出生产就绪型全栈边缘 AI 解决方案,赋能MCU和MPU实现 智能实时决策
- LoRa、LoRaWAN、NB-IoT与4G DTU技术对比及工业无线方案选型分析
-

【TI MSPM0 应用实战】智能小车+工业角度编码器+血氧仪+烟雾探测器!硬核参考设计详解!
-

2022 Digi-Key KOL 系列: 你见过1GHz主频的单片机吗?Teensy 4.1开发板介绍
-

TI 新一代 C2000™ 微控制器:全方位助力伺服及马达驱动应用
-

MSP430电容触摸技术 - 防水Demo演示
-

直播回放: Microchip Timberwolf™ 音频处理器在线研讨会
-

基于灵动MM32W0系列MCU的指夹血氧仪控制及OTA升级应用方案分享
-
1瓦线性调频增强器
-

家用电器遥控器
-
12V 转 28V DC-DC 变换器(基于 LM2585)
-
红外开关
-
DS1669数字电位器
-
HA1377 桥式放大器 BCL 电容 17W(汽车音频)