


ESP32学习笔记(24)——OTA(空中升级)接口使用(原生API)
2025-02-28 来源:jianshu
一、概述
ESP32应用程序可以在运行时通过Wi-Fi或以太网从特定的服务器下载新映像,然后将其闪存到某些分区中,从而进行升级。
在ESP-IDF中有两种方式可以进行空中(OTA)升级:
使用 app_update 组件提供的原生API
使用 esp_https_ota 组件提供的简化API,它在原生OTA API上添加了一个抽象层,以便使用HTTPS协议进行升级。
分别在 native_ota_example 和 simple_ota_example 下的OTA示例中演示了这两种方法。
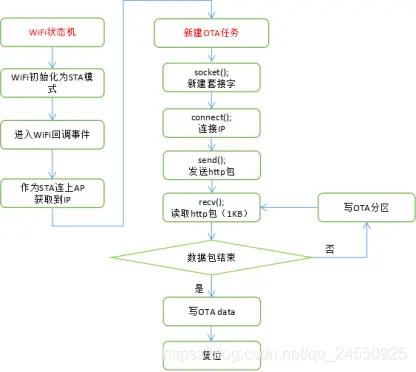
1.1 OTA工作流程
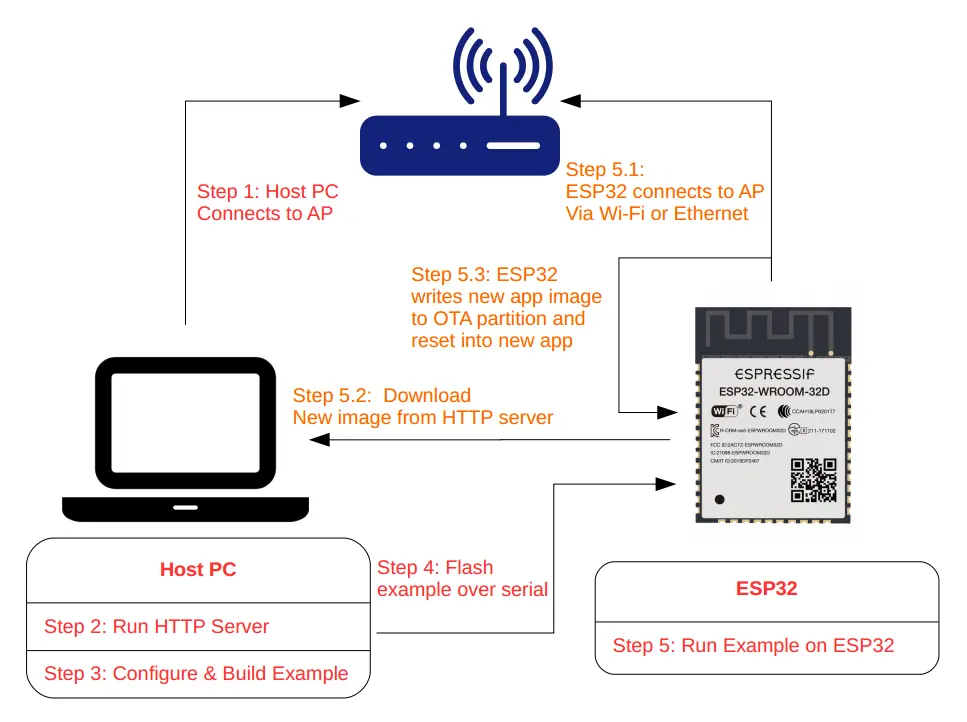
1.2 OTA数据分区
ESP32 SPI Flash 内有与升级相关的(至少)四个分区:OTA data、Factory App、OTA_0、OTA_1。其中 FactoryApp 内存有出厂时的默认固件。
首次进行 OTA 升级时,OTA Demo 向 OTA_0 分区烧录目标固件,并在烧录完成后,更新 OTA data 分区数据并重启。
系统重启时获取 OTA data 分区数据进行计算,决定此后加载 OTA_0 分区的固件执行(而不是默认的 Factory App 分区内的固件),从而实现升级。
同理,若某次升级后 ESP32 已经在执行 OTA_0 内的固件,此时再升级时 OTA Demo 就会向 OTA_1 分区写入目标固件。再次启动后,执行 OTA_1 分区实现升级。以此类推,升级的目标固件始终在 OTA_0、OTA_1 两个分区之间交互烧录,不会影响到出厂时的 Factory App 固件。
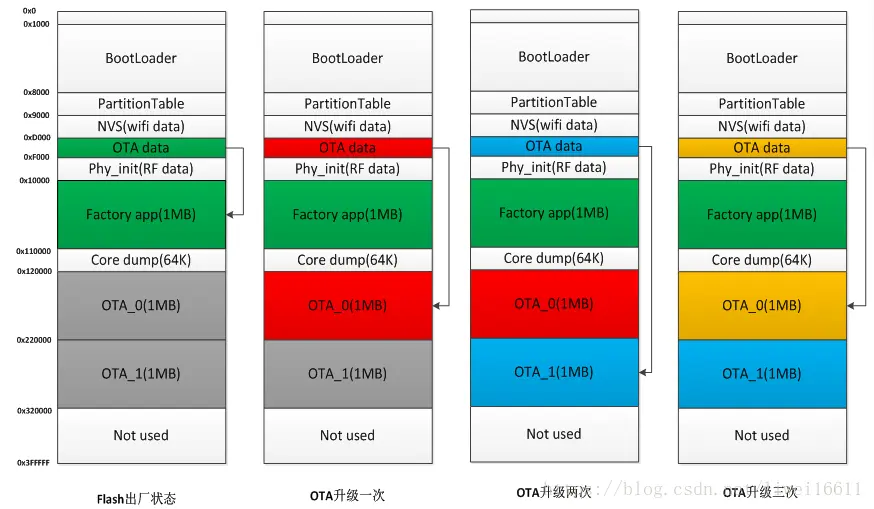
为了简单起见,OTA示例通过在menuconfig中启用CONFIG_PARTITION_TABLE_TWO_OTA选项来选择预定义的分区表,该选项支持三个应用程序分区:工厂分区、OTA_0分区和OTA_1分区。有关分区表的更多信息,请参阅分区表.
二、API说明
以下原生 OTA 接口位于 app_update/include/esp_ota_ops.h。
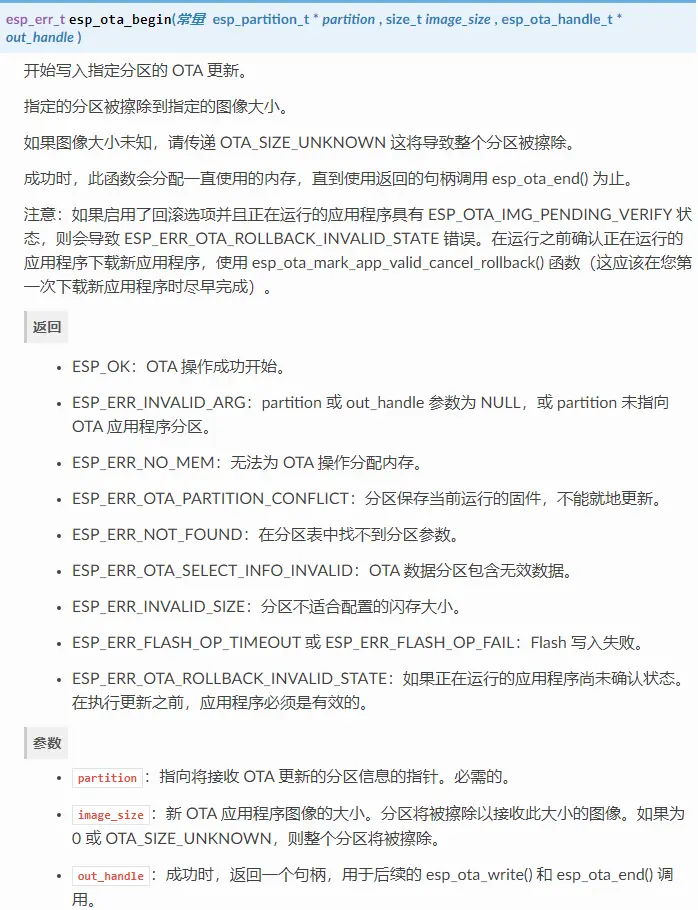
2.1 esp_ota_begin
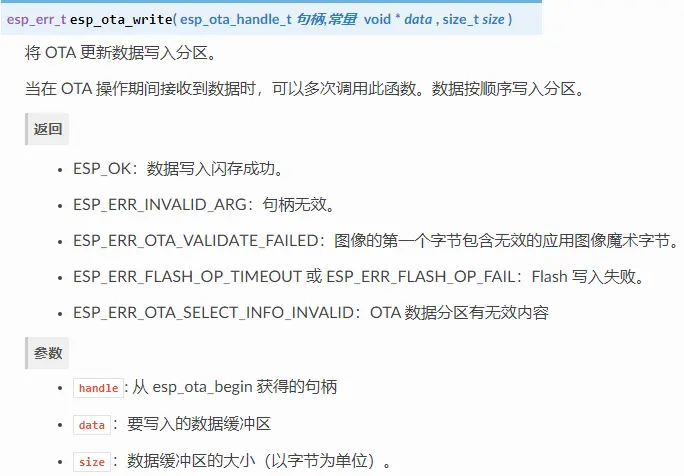
2.2 esp_ota_write
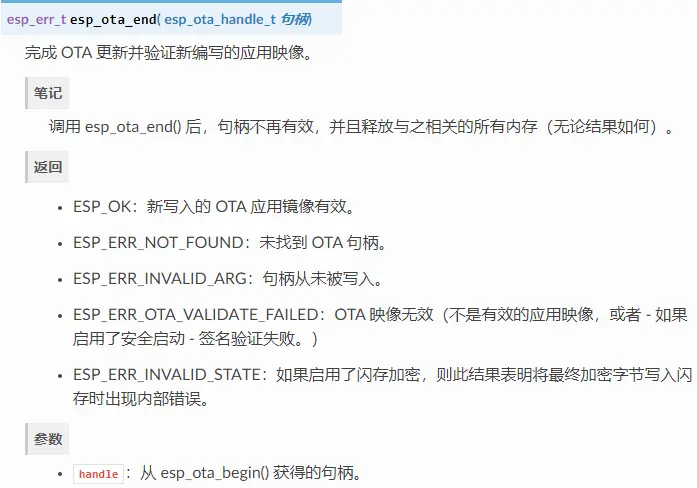
2.3 esp_ota_end
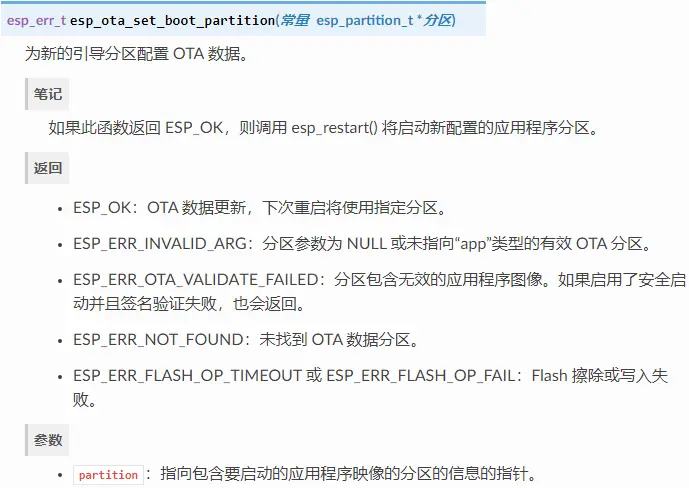
2.4 esp_ota_set_boot_partition
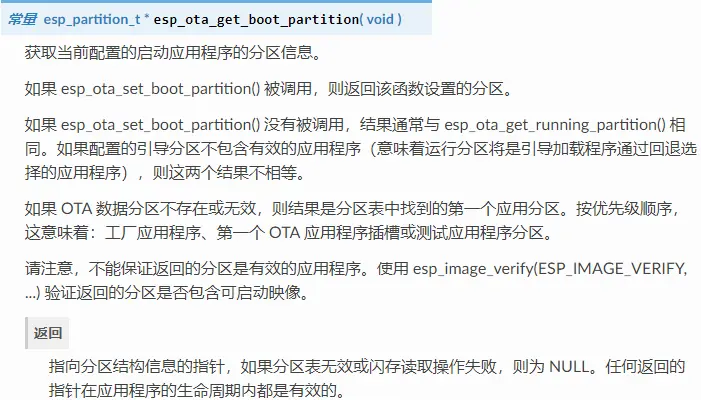
2.5 esp_ota_get_boot_partition
2.6 esp_ota_get_running_partition

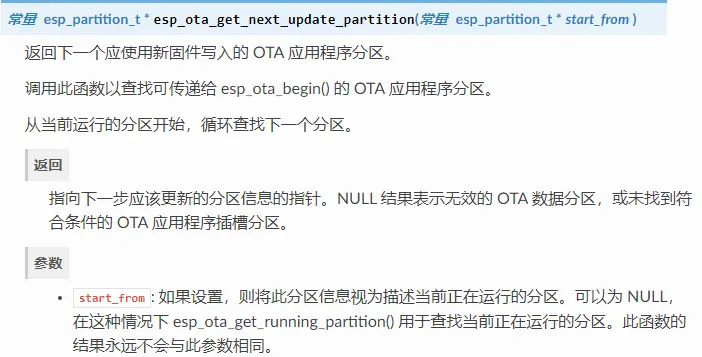
2.7 esp_ota_get_next_update_partition
三、编程流程
3.1 OTA详细过程逻辑
3.2 OTA分区操作流程
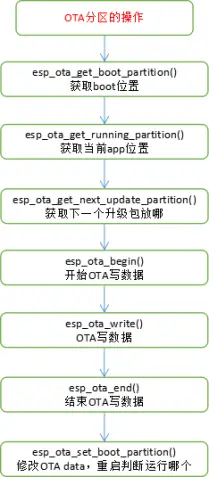
节选自 esp-idfexamplessystemotanative_ota_example 中的例程
static void ota_example_task(void *pvParameter){
esp_err_t err;
/* update handle : set by esp_ota_begin(), must be freed via esp_ota_end() */
esp_ota_handle_t update_handle = 0 ;
const esp_partition_t *update_partition = NULL;
ESP_LOGI(TAG, 'Starting OTA example');
//获取OTA app存放的位置
const esp_partition_t *configured = esp_ota_get_boot_partition();
//获取当前系统执行的固件所在的Flash分区
const esp_partition_t *running = esp_ota_get_running_partition();
if (configured != running) {
ESP_LOGW(TAG, 'Configured OTA boot partition at offset 0x%08x, but running from offset 0x%08x',
configured->address, running->address);
ESP_LOGW(TAG, '(This can happen if either the OTA boot data or preferred boot image become corrupted somehow.)');
}
ESP_LOGI(TAG, 'Running partition type %d subtype %d (offset 0x%08x)',
running->type, running->subtype, running->address);
esp_http_client_config_t config = {
.url = CONFIG_EXAMPLE_FIRMWARE_UPG_URL,
.cert_pem = (char *)server_cert_pem_start,
.timeout_ms = CONFIG_EXAMPLE_OTA_RECV_TIMEOUT,
};#ifdef CONFIG_EXAMPLE_FIRMWARE_UPGRADE_URL_FROM_STDIN
char url_buf[OTA_URL_SIZE];
if (strcmp(config.url, 'FROM_STDIN') == 0) {
example_configure_stdin_stdout();
fgets(url_buf, OTA_URL_SIZE, stdin);
int len = strlen(url_buf);
url_buf[len - 1] = '�';
config.url = url_buf;
} else {
ESP_LOGE(TAG, 'Configuration mismatch: wrong firmware upgrade image url');
abort();
}#endif#ifdef CONFIG_EXAMPLE_SKIP_COMMON_NAME_CHECK
config.skip_cert_common_name_check = true;#endif
esp_http_client_handle_t client = esp_http_client_init(&config);
if (client == NULL) {
ESP_LOGE(TAG, 'Failed to initialise HTTP connection');
task_fatal_error();
}
//连http服务器
err = esp_http_client_open(client, 0);
if (err != ESP_OK) {
ESP_LOGE(TAG, 'Failed to open HTTP connection: %s', esp_err_to_name(err));
esp_http_client_cleanup(client);
task_fatal_error();
}
esp_http_client_fetch_headers(client);
//获取当前系统下一个(紧邻当前使用的OTA_X分区)可用于烧录升级固件的Flash分区
update_partition = esp_ota_get_next_update_partition(NULL);
ESP_LOGI(TAG, 'Writing to partition subtype %d at offset 0x%x',
update_partition->subtype, update_partition->address);
assert(update_partition != NULL);
int binary_file_length = 0;
/*deal with all receive packet*/
bool image_header_was_checked = false;
while (1) {
int data_read = esp_http_client_read(client, ota_write_data, BUFFSIZE);
if (data_read < 0) {
ESP_LOGE(TAG, 'Error: SSL data read error');
http_cleanup(client);
task_fatal_error();
} else if (data_read > 0) {
if (image_header_was_checked == false) {
esp_app_desc_t new_app_info;
if (data_read > sizeof(esp_image_header_t) + sizeof(esp_image_segment_header_t) + sizeof(esp_app_desc_t)) {
// check current version with downloading
memcpy(&new_app_info, &ota_write_data[sizeof(esp_image_header_t) + sizeof(esp_image_segment_header_t)], sizeof(esp_app_desc_t));
ESP_LOGI(TAG, 'New firmware version: %s', new_app_info.version);
esp_app_desc_t running_app_info;
if (esp_ota_get_partition_description(running, &running_app_info) == ESP_OK) {
ESP_LOGI(TAG, 'Running firmware version: %s', running_app_info.version);
}
const esp_partition_t* last_invalid_app = esp_ota_get_last_invalid_partition();
esp_app_desc_t invalid_app_info;
if (esp_ota_get_partition_description(last_invalid_app, &invalid_app_info) == ESP_OK) {
ESP_LOGI(TAG, 'Last invalid firmware version: %s', invalid_app_info.version);
}
// check current version with last invalid partition
if (last_invalid_app != NULL) {
if (memcmp(invalid_app_info.version, new_app_info.version, sizeof(new_app_info.version)) == 0) {
ESP_LOGW(TAG, 'New version is the same as invalid version.');
ESP_LOGW(TAG, 'Previously, there was an attempt to launch the firmware with %s version, but it failed.', invalid_app_info.version);
ESP_LOGW(TAG, 'The firmware has been rolled back to the previous version.');
http_cleanup(client);
infinite_loop();
}
}#ifndef CONFIG_EXAMPLE_SKIP_VERSION_CHECK
if (memcmp(new_app_info.version, running_app_info.version, sizeof(new_app_info.version)) == 0) {
ESP_LOGW(TAG, 'Current running version is the same as a new. We will not continue the update.');
http_cleanup(client);
infinite_loop();
}#endif
image_header_was_checked = true;
//OTA写开始
err = esp_ota_begin(update_partition, OTA_SIZE_UNKNOWN, &update_handle);
if (err != ESP_OK) {
ESP_LOGE(TAG, 'esp_ota_begin failed (%s)', esp_err_to_name(err));
http_cleanup(client);
task_fatal_error();
}
ESP_LOGI(TAG, 'esp_ota_begin succeeded');
} else {
ESP_LOGE(TAG, 'received package is not fit len');
http_cleanup(client);
task_fatal_error();
}
}
//写flash
err = esp_ota_write( update_handle, (const void *)ota_write_data, data_read);
if (err != ESP_OK) {
http_cleanup(client);
task_fatal_error();
}
binary_file_length += data_read;
ESP_LOGD(TAG, 'Written image length %d', binary_file_length);
} else if (data_read == 0) {
/*
* As esp_http_client_read never returns negative error code, we rely on
* `errno` to check for underlying transport connectivity closure if any
*/
if (errno == ECONNRESET || errno == ENOTCONN) {
ESP_LOGE(TAG, 'Connection closed, errno = %d', errno);
break;
}
if (esp_http_client_is_complete_data_received(client) == true) {
ESP_LOGI(TAG, 'Connection closed');
break;
}
}
}
ESP_LOGI(TAG, 'Total Write binary data length: %d', binary_file_length);
if (esp_http_client_is_complete_data_received(client) != true) {
ESP_LOGE(TAG, 'Error in receiving complete file');
http_cleanup(client);
task_fatal_error();
}
//OTA写结束
err = esp_ota_end(update_handle);
if (err != ESP_OK) {
if (err == ESP_ERR_OTA_VALIDATE_FAILED) {
ESP_LOGE(TAG, 'Image validation failed, image is corrupted');
}
ESP_LOGE(TAG, 'esp_ota_end failed (%s)!', esp_err_to_name(err));
http_cleanup(client);
task_fatal_error();
}
//升级完成更新OTA data区数据,重启时根据OTA data区数据到Flash分区加载执行目标(新)固件
err = esp_ota_set_boot_partition(update_partition);
if (err != ESP_OK) {
ESP_LOGE(TAG, 'esp_ota_set_boot_partition failed (%s)!', esp_err_to_name(err));
http_cleanup(client);
task_fatal_error();
}
ESP_LOGI(TAG, 'Prepare to restart system!');
esp_restart();
return ;}
四、测试流程
4.1 配置Flash大小
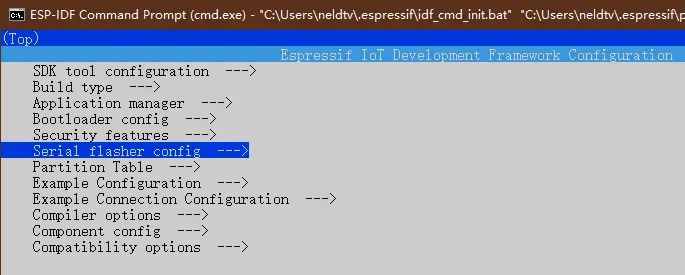
打开项目配置菜单 idf.py menuconfig
选择串行Flash配置 Serial flasher config --->
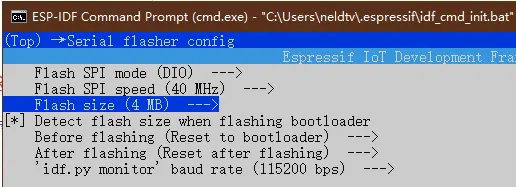
根据模块Flash大小,更改 Flash size,我使用的是 ESP32-WROVER-B 模组,所以修改为 4 MB。
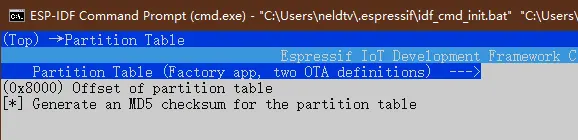
4.2 配置分区表
选择分区表配置 Partition Table --->
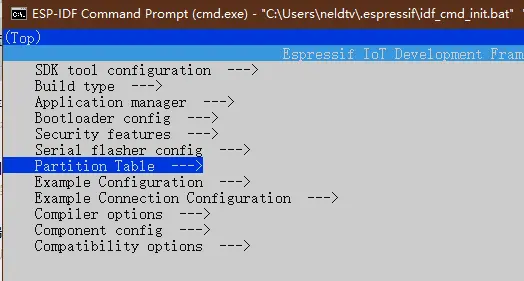
选择 Factory app, two OTA definitions
4.3 配置服务器信息
看服务器类型修改 https 或 http
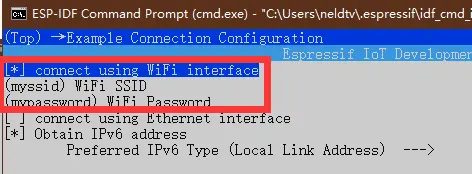
4.4 配置连接方式
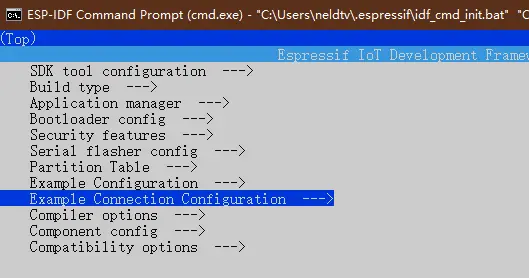
选择WIFI连接方式,并修改要连接路由器的SSID和密码
4.5 配置APP版本号
Note: native_ota_example 中没有版本号大小检查,它看到不同的版本就会下载。当本地设备是比OTA服务器版本号更高的时候,也会下载OTA服务器的旧版进行更新。这个需要自行添加版本号大小检查。
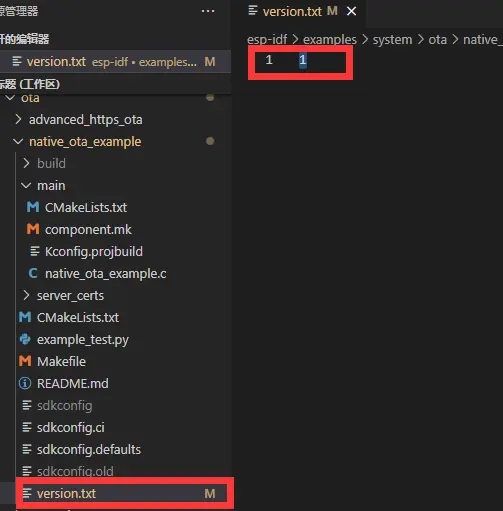
4.5.1 通过version.txt控制
4.5.2 通过menuconfig控制
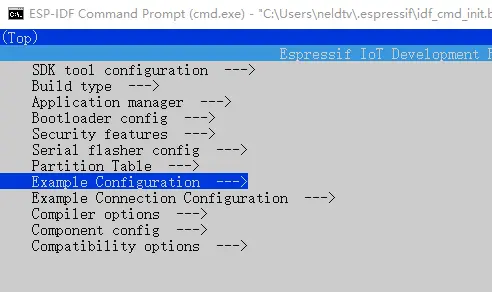
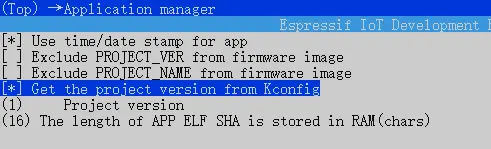
选择应用管理 Application manager --->
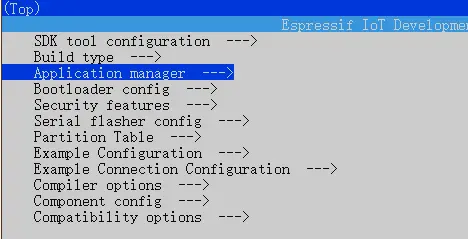
勾选 Get the project version from Kconfig 并在下面填写版本号。
4.6 开启HTTP服务器(可选)
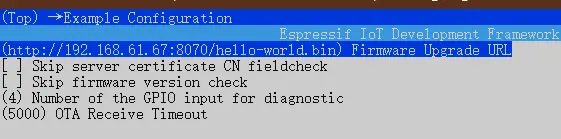
编译链内 Python 有一个内置的 HTTP 服务器,我们这里可以直接使用它。我们将会使用示例 get-started/hello_world 作为需要更新的固件。
4.6.1 生成目标固件
使用示例 get-started/hello_world,此处执行idf.py build 会生成二进制文件get-startedhello_worldbuildhello-world.bin。
4.6.2 创建HTTP服务器
使用工具链python创建服务器
进入存放需要升级的固件(hello-world.bin)目录。在此处创建HTTP服务器。
此处执行 python -m http.server --bind 192.168.61.67 8070会生成一个HTTP本地服务器。该服务器下对应build文件夹下所有内容。(有的文章执行的python命令不同,是由于python版本不同造成的。)
使用HFS创建服务器
链接:https://pan.baidu.com/s/1MIAI5m4WQJdAZpqRAdvsXg 提取码:9m8y
4.7 开启HTTPS服务器(可选)
Shirt + 鼠标右键 打开 Linux shell
创建一个新的自签名证书和密钥
openssl req -x509 -newkey rsa:2048 -keyout ca_key.pem -out ca_cert.pem -days 365 -nodes
依次输入:(国家)、(洲/省)、(城/镇)、(组织名)、(单位名)、(httpd-ssl.conf中的ServerName 名称)、(邮箱)将生成的证书 ca_cert.pem 复制到OTA示例目录中的 server_certs 目录下,已存在则替换内容

创建HTTPS服务器
openssl s_server -WWW -key ca_key.pem -cert ca_cert.pem -port 8070
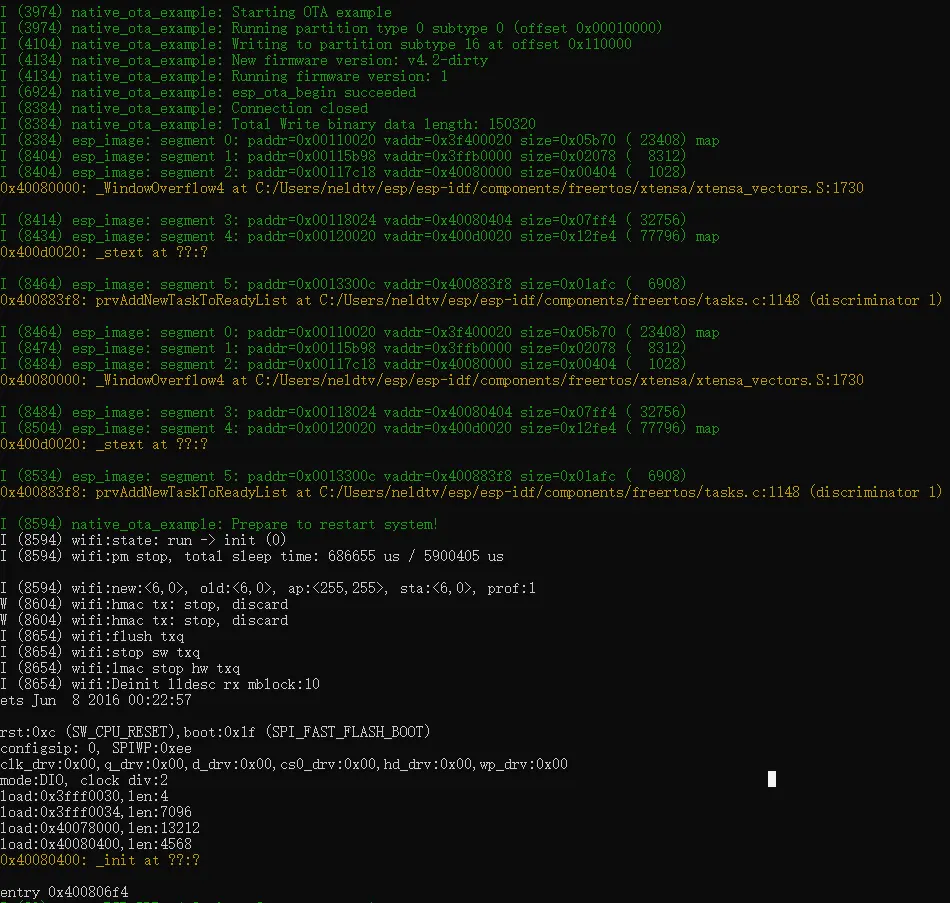
4.8 查看打印

- ESP32/8266固件备份方法
- upyOS:基于 MicroPython 的模块化操作系统,兼容 ESP32、RP2040 等微控制器
- ESP32与STM32哪个更适合初学者?问题解析与对比
- STM32与ESP32核心应用场景解析及PCB设计实践(深度探讨)
- ESP32与STM32:比较并非明智之举
- ESP32与STM32:性能对比分析及选型指南
- STM32与ESP32:核心差异详解
- 串口、并口、USB、UART及RS232/RS485接口与ESP32、STM32的应用解析
- ESP32音频输入-MAX4466,MAX9814,SPH0645LM4H,INMP441
- ESP32 ADF windows开发环境搭建 适配ADF到ESP32A1S
- 六大全新产品系列推出,MCX A微控制器家族迎来创新
- 意法半导体全新STM32C5系列,重新定义入门级微控制器性能与价值,赋能万千智能设备
- 模组复用与整机重测在SRRC、CCC、CTA/NAL认证中的实践操作指南
- 从控制到系统:TI利用边缘AI重塑嵌入式MCU的边界
- 有源晶振与无源晶振的六大区别详解
- 英飞凌持续巩固全球微控制器市场领导地位
- 使用 Keil Studio for Visual Studio Code开发 STM32 设备
- 蓝牙信道探测技术原理与开发套件实践
- Microchip 推出生产就绪型全栈边缘 AI 解决方案,赋能MCU和MPU实现 智能实时决策
- LoRa、LoRaWAN、NB-IoT与4G DTU技术对比及工业无线方案选型分析
-

【TI MSPM0 应用实战】智能小车+工业角度编码器+血氧仪+烟雾探测器!硬核参考设计详解!
-

2022 Digi-Key KOL 系列: 你见过1GHz主频的单片机吗?Teensy 4.1开发板介绍
-

TI 新一代 C2000™ 微控制器:全方位助力伺服及马达驱动应用
-

MSP430电容触摸技术 - 防水Demo演示
-

直播回放: Microchip Timberwolf™ 音频处理器在线研讨会
-

基于灵动MM32W0系列MCU的指夹血氧仪控制及OTA升级应用方案分享
-
1瓦线性调频增强器
-
1瓦四级调频发射机
-
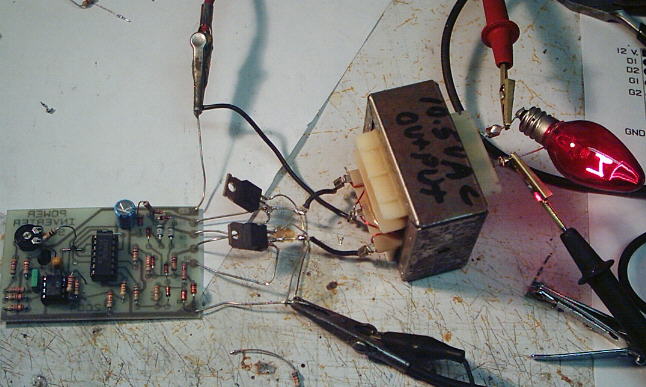
500W MOS场效应管电源逆变器,12V转110V/220V
-
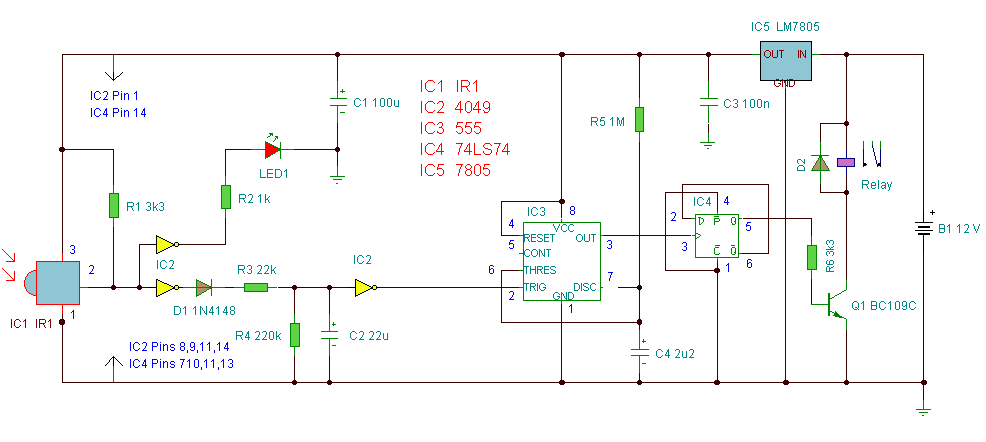
红外开关
-
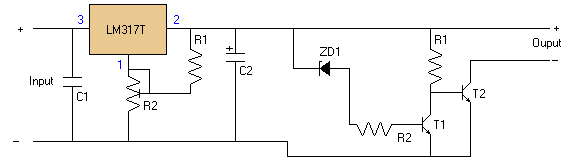
LM317过压保护
-
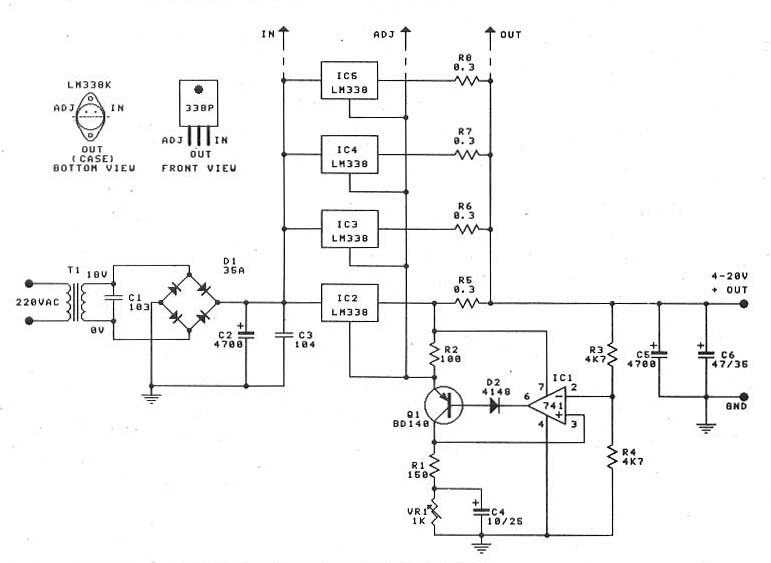
0-30V/20A 大功率稳压电源(采用LM338)