


【GD32H757Z海棠派开发板使用手册】第十讲 USART-中断串口收发实验
2024-12-13 来源:elecfans
10.1实验内容
通过本实验主要学习以下内容:
使用中断进行串口收发
10.2实验原理
10.2.1串口寄存器介绍
串口有几个非常重要的寄存器需要读者理解。
数据接收寄存器(USART_RDATA)

数据发送寄存器(USART_RDATA)

发送时,除了发送数据寄存器,还有一个移位寄存器,当数据写入数据寄存器中,移位寄存器空闲的情况下,数据从数据寄存器中转移到移位寄存器,移位寄存器按照低bit——高bit的顺序将数据移位到IO口上。
接收时,接收到的数据保存在数据接收寄存器中,CPU或DMA可以从该寄存器中读接收到的数据。
状态寄存器(USART_STAT )
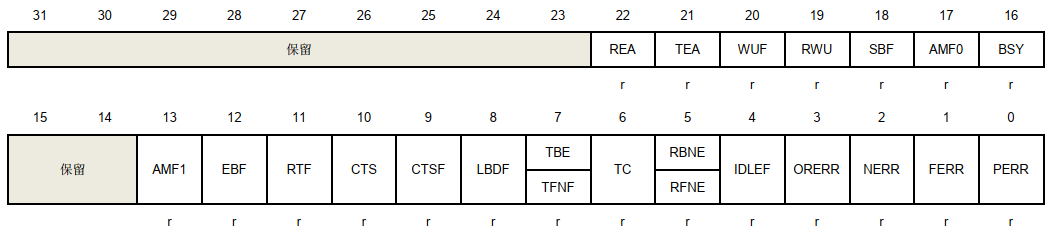
我们需要特别理解TBE、TC、RBNE、IDLE、OREE这几位。
TBE(发送空):这个位置“1”表示现在可以往数据寄存器中写数据了,当移位寄存器空闲时,写入到数据寄存器中的数据则会转移到移位寄存器中,串口开始对外发送数据;
TC(发送完成):发送数据时,当数据寄存器和移位寄存器都为空时,表示所有的数据都已经完成了,则TC置“1”,所以当连续发数据时,最后一个字节从移位寄存器中发送完,TC才会置起。
RBNE(接受非空):当串口接受到一个字节数据,RBNE置“1”,此时CPU可以去数据寄存器中取数据,当使用了DMA接受,DMA自动将数据寄存器中数据搬走,当数据寄存器数据被读走/搬走,RBNE位自动清“0”;
IDLE(空闲):该标志位用于检测接受空闲,当串口接受最后一个字节后,再往后一个字节时间内,没有接受到新的数据,则该位置“1”;
IDLE一般用于串口DMA接受中,DMA接受中,MCU无法知道发送方的数据个数,所以可以通过判断IDLE位(或IDLE中断)来判断发送方一帧数据发送结束了。 |
5. OREE(溢出错误):当RBNE置位的情况,又接收到一个字节数据,则OREE位置“1”。
以上就是串口寄存器的介绍。本实验就是使用TBE中断和RBNE中断来实现中断收发数据,实验原理是RBNE中断用来接受数据,IDLE中断用于判断发送方数据结束,TBE中断用于发送数据。
10.3硬件设计
本实验使用P1接口的PA9和PA10实现串口功能,硬件设计请见上一章。
10.4代码解析
10.4.1串口中断发送函数
在driver_uart.c中定义了串口中断发送函数:
C
Drv_Err driver_uart_int_transmit(typdef_uart_struct *uartx,uint8_t *pbuff,uint16_t length)
{
__IO uint64_t timeout = driver_tick;
while(uartx->uart_control.Com_Flag.Bits.SendState==1){
if((timeout+UART_TIMEOUT_MS) <= driver_tick) {
uartx->uart_control.Com_Flag.Bits.SendState=0;
return DRV_ERROR;
}
}
uartx->uart_control.Com_Flag.Bits.SendSuccess=0;
uartx->uart_control.Com_Flag.Bits.SendState=1;
uartx->uart_control.p_Send=pbuff;
uartx->uart_control.SendSize=length;
uartx->uart_control.SendCount=0;
usart_flag_clear(uartx->uart_x,USART_FLAG_TC);
usart_interrupt_enable(uartx->uart_x,USART_INT_TBE);
return DRV_SUCCESS;
}
10.4.2串口中断接受函数
在driver_uart.c中定义了串口中断接受函数:
C
Drv_Err driver_uart_int_receive(typdef_uart_struct *uartx,uint8_t *pbuff,uint16_t length)
{
__IO uint64_t timeout = driver_tick;
while(uartx->uart_control.Com_Flag.Bits.RecState==1){
if((timeout+UART_TIMEOUT_MS) <= driver_tick) {
uartx->uart_control.Com_Flag.Bits.RecState=0;
return DRV_ERROR;
}
}
if(usart_flag_get(uartx->uart_x,USART_FLAG_ORERR))
{
usart_flag_clear(uartx->uart_x,USART_FLAG_ORERR);
}
uartx->uart_control.Com_Flag.Bits.RecSuccess=0;
uartx->uart_control.Com_Flag.Bits.RecState=1;
uartx->uart_control.p_Rec=pbuff;
uartx->uart_control.RecSize=length;
uartx->uart_control.RecCount=0;
usart_flag_clear(uartx->uart_x,USART_FLAG_IDLE);
usart_interrupt_enable(uartx->uart_x,USART_INT_RBNE);
usart_interrupt_enable(uartx->uart_x,USART_INT_IDLE);
return DRV_SUCCESS;
}
10.4.3main函数实现
以下为main函数代码:
C
int main(void)
{
//延时、共用驱动部分初始化
driver_init();
//初始化UART为中断模式,注册接受完成(IDLE)回调函数
BOARD_UART.uart_mode_tx=MODE_INT;
BOARD_UART.uart_mode_rx=MODE_INT;
BOARD_UART.uart_idle_callback=user_receive_complete_callback;
bsp_uart_init(&BOARD_UART);
bsp_led_init(&LED2);
bsp_led_init(&LED1);
bsp_led_on(&LED2);
bsp_led_off(&LED1);
//使能UART中断
nvic_irq_enable(USART0_IRQn,2,0);
delay_ms(100);
printf_log('uart interrupt mode sends and receives loopback packets of indefinite length.rn');
//启动UART中断接受,最长100byte
driver_uart_int_receive(&BOARD_UART,uart_rec_buff,100);
while (1)
{
//查询到接受完成回调函数标志
if(uart_receive_complete_flag==SET)
{
uart_receive_complete_flag=RESET;
//启动中断方式发送刚接受到的数据
driver_uart_int_transmit(&BOARD_UART,uart_send_buff,uart_receive_count);
printf_log('rn The received data is %srn',uart_send_buff);
memset(uart_send_buff,0,100);
}
}
}
本例程main函数首先进行了延时函数初始化,再初始化UART为中断模式,接着配置串口BOARD_UART,开启串口中断NVIC,这里使用到了IDLE中断,TBE中断和RBNE中断,然后配置串口D中断接受,最长100个字节,所以我们可以给串口发送100个字节以下长度的数据。在while(1)循环中循环查询uart_receive_complete_flag标志位,当该标志位为“SET”时,表示IDLE中断被触发,一帧数据接受完,最后将接收到的帧数据通过中断发送方式原封不动发送到串口上。
10.4.4中断函数
在bsp_uart.c中定义了串口中断处理函数
C
void USART0_IRQHandler(void)
{
driver_uart_int_handler(&BOARD_UART);
}
在driver_uart.c中定义了driver_uart_int_handler函数:
C
Drv_Err driver_uart_int_handler(typdef_uart_struct *uartx)
{
Drv_Err uart_state=DRV_SUCCESS;
if(usart_interrupt_flag_get(uartx->uart_x,USART_INT_FLAG_RBNE)!=RESET)
{
if(uartx->uart_control.RecCount < uartx->uart_control.RecSize){
uartx->uart_control.p_Rec[uartx->uart_control.RecCount]=usart_data_receive(uartx->uart_x);
uartx->uart_control.RecCount++;
}
else{
usart_data_receive(uartx->uart_x);
uart_state=DRV_ERROR;
//err 溢出
}
if(uartx->uart_rbne_callback!=NULL){
uartx->uart_rbne_callback(uartx);
}
//callback
if(uartx->uart_control.RecCount == uartx->uart_control.RecSize){
uartx->uart_control.Com_Flag.Bits.RecSuccess=1;
uartx->uart_control.Com_Flag.Bits.RecState=0;
uartx->uart_control.RecCount=0;
}
}
if(usart_interrupt_flag_get(uartx->uart_x,USART_INT_FLAG_IDLE)!=RESET)
{
usart_interrupt_flag_clear(uartx->uart_x,USART_INT_FLAG_IDLE);
if( (uartx->uart_mode_rx==MODE_INT && uartx->uart_control.RecCount>0)
||(uartx->uart_mode_rx==MODE_DMA && dma_transfer_number_get(uartx->uart_rx_dma->dmax,uartx->uart_rx_dma->dma_chx)!=uartx->uart_control.RecSize))
{
uartx->uart_control.Com_Flag.Bits.RecSuccess=1;
uartx->uart_control.Com_Flag.Bits.RecState=0;
if(uartx->uart_mode_rx==MODE_DMA){
uartx->uart_control.RecCount=uartx->uart_control.RecSize-dma_transfer_number_get(uartx->uart_rx_dma->dmax,uartx->uart_rx_dma->dma_chx);
}
//callback
if(uartx->uart_idle_callback!=NULL){
uartx->uart_idle_callback(uartx);
}
}
}
if(usart_interrupt_flag_get(uartx->uart_x,USART_INT_FLAG_TBE)!=RESET)
{
usart_data_transmit(uartx->uart_x,uartx->uart_control.p_Send[uartx->uart_control.SendCount]);
uartx->uart_control.SendCount++;
if(uartx->uart_tbe_callback!=NULL){
uartx->uart_tbe_callback(uartx);
}
if(uartx->uart_control.SendCount >= uartx->uart_control.SendSize)
{
uartx->uart_control.SendCount=0;
usart_interrupt_disable(uartx->uart_x, USART_INT_TBE);
usart_interrupt_enable(uartx->uart_x, USART_INT_TC);
}
}
if(usart_interrupt_flag_get(uartx->uart_x,USART_INT_FLAG_TC)!=RESET)
{
usart_interrupt_disable(uartx->uart_x, USART_INT_TC);
usart_flag_clear(uartx->uart_x,USART_FLAG_TC);
if( !(uartx->uart_mode_rx==MODE_DMA && dma_transfer_number_get(uartx->uart_tx_dma->dmax,uartx->uart_tx_dma->dma_chx)!=0) )
{
uartx->uart_control.Com_Flag.Bits.SendSuccess=1;
uartx->uart_control.Com_Flag.Bits.SendState=0;
if(uartx->uart_tc_callback!=NULL){
uartx->uart_tc_callback(uartx);
}
uartx->uart_control.SendCount=0;
}
}
if(usart_flag_get(uartx->uart_x,USART_FLAG_ORERR)==SET)
{
usart_flag_clear(uartx->uart_x,USART_FLAG_ORERR);
uart_state=DRV_ERROR;
}
return uart_state;
}
10.5实验结果
使用串口调试助手发送一帧数据到MCU,MCU会将这帧数据回发到串口调试助手中。


- 【GD32H757Z海棠派开发板使用手册】第十五讲 TFT-8080电阻屏屏触摸实验
- 【GD32H757Z海棠派开发板使用手册】第七讲 FWDG-看门狗实验
- 【GD32H757Z海棠派开发板使用手册】第六讲 TIMER_3路PWM输出实验
- 【GD32H757Z海棠派开发板使用手册】第三讲 EXTI-按键中断检测实验
- 【GD32H757Z海棠派开发板使用手册】第一讲 GPIO-流水灯实验
- 【GD32H757Z海棠派开发板使用手册】第五讲 PMU-低功耗实验
- 【GD32H757Z海棠派开发板使用手册】第四讲 FMC-片内Flash擦写读实验
- 【GD32H757Z海棠派开发板使用手册】第二讲 GPIO-按键查询检测实验
- 【GD32H757Z海棠派开发板使用手册】第九讲 USART-printf打印实验
- STM32 USART学习
- 六大全新产品系列推出,MCX A微控制器家族迎来创新
- 意法半导体全新STM32C5系列,重新定义入门级微控制器性能与价值,赋能万千智能设备
- 模组复用与整机重测在SRRC、CCC、CTA/NAL认证中的实践操作指南
- 从控制到系统:TI利用边缘AI重塑嵌入式MCU的边界
- 有源晶振与无源晶振的六大区别详解
- 英飞凌持续巩固全球微控制器市场领导地位
- 使用 Keil Studio for Visual Studio Code开发 STM32 设备
- 蓝牙信道探测技术原理与开发套件实践
- Microchip 推出生产就绪型全栈边缘 AI 解决方案,赋能MCU和MPU实现 智能实时决策
- LoRa、LoRaWAN、NB-IoT与4G DTU技术对比及工业无线方案选型分析
-

【TI MSPM0 应用实战】智能小车+工业角度编码器+血氧仪+烟雾探测器!硬核参考设计详解!
-

2022 Digi-Key KOL 系列: 你见过1GHz主频的单片机吗?Teensy 4.1开发板介绍
-

TI 新一代 C2000™ 微控制器:全方位助力伺服及马达驱动应用
-

MSP430电容触摸技术 - 防水Demo演示
-

直播回放: Microchip Timberwolf™ 音频处理器在线研讨会
-

基于灵动MM32W0系列MCU的指夹血氧仪控制及OTA升级应用方案分享
-
1瓦线性调频增强器
-
1瓦四级调频发射机
-
500W MOS场效应管电源逆变器,12V转110V/220V
-
红外开关
-
LM317过压保护
-
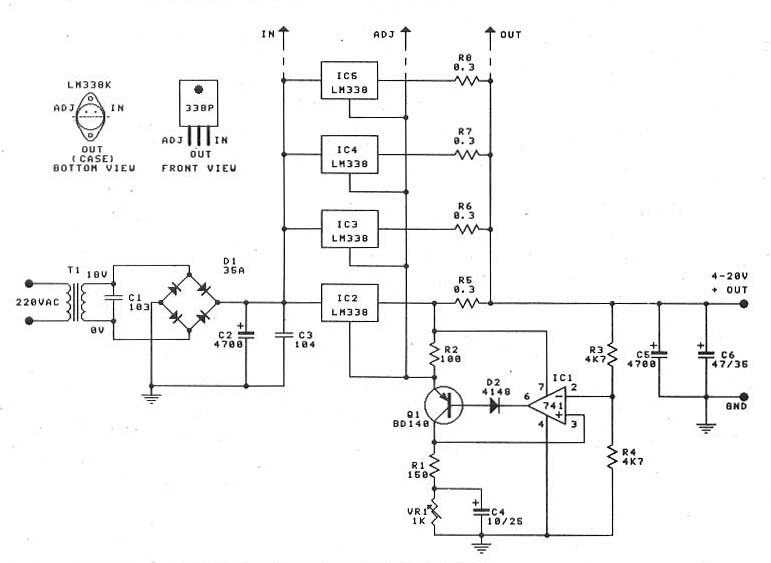
0-30V/20A 大功率稳压电源(采用LM338)