


VSCode+OpenOCD+STM32CubeMX开发与调试STM32单片机环境
2025-08-29 来源:cnblogs
需要的东西
需要的软件:

VSCode插件
| 名称 | 备注 |
|---|---|
| C/C++ | 编译代码 |
| Cortex-Debug | 配合OpenOCD调试与烧录 |
需要的硬件:
STM32开发板 STLINK(或其他usb转jtag工具)
新建工程需要添加的文件
VSCode配置文件(放在.vscode目录):
launch.json
{
'version': '0.2.0',
'configurations': [
{//本地调试
'name': 'Local Debug',
'cwd': '${workspaceRoot}',
'executable': './build/${workspaceRootFolderName}.elf',
'request': 'launch',
'type': 'cortex-debug',
'preLaunchTask': 'build',
'servertype': 'openocd',
//'device': 'STM32H750VB', //这个不是很重要,写不写应该无所谓
'configFiles': [
'openocd.cfg'
]
},
{ //另一种调试方案,需要用StartOCD单独打开OCD.调试的时候不会进入startup_xxx.s文件,支持通过网络调试
//有一个美中不足之处:需要在装载文件的地方手工指定全路径
'name': 'Remote Debug',
'type': 'cppdbg',
'request': 'launch',
'miDebuggerPath': 'arm-none-eabi-gdb.exe',
'targetArchitecture': 'arm',
'program': '${workspaceFolder}/build/${workspaceRootFolderName}.elf',
'preLaunchTask': 'build',
'setupCommands': [
{
'description': '装载文件',
'text': 'file 'E:/projects/Folder/${workspaceRootFolderName}/build/${workspaceRootFolderName}.elf'',
//'ignoreFailures': true //忽略异常
},
{
'text': 'target remote localhost:3333'
},
{
'text': 'monitor reset'
},
{
'text': 'monitor halt'
},
{
'text': 'load'
}
],
'launchCompleteCommand': 'None',
'externalConsole': true,
'cwd': '${workspaceFolder}'
}
]
}
tasks.json
{
// See https://go.microsoft.com/fwlink/?LinkId=733558
// for the documentation about the tasks.json format
'version': '2.0.0',
'tasks': [
{
'label': 'build',
'type': 'shell',
'command': 'make -j8'
},
{
'label': 'startocd',
'type': 'shell',
'command': 'cmd StartOCD.bat'
}
]
}
Openocd配置文件(放在工程根目录)
openocd.cfg
# 需要根据jtag工具修改
source [find interface/stlink.cfg]
# 需要根据要调试的芯片修改
source [find target/stm32h7x.cfg]
# use hardware reset, connect under reset
# connect_assert_srst needed if low power mode application running (WFI...)
# reset_config srst_only srst_nogate connect_assert_srst
reset_config none
StartOCD.bat
clear
openocd -f openocd.cfg -c init -c 'reset halt'
::一些配置以及烧录语句,根据情况使用:
::-c 'flash write_image erase E:/projects/Folder/STM32H7Template/build/STM32H7Template.bin 0x8000000'
::-c 'stm32h7x unlock 0'
- Keil5安装+STM32CubeMX安装+VSCode辅助开发教程
- Linux 下 VScode + gcc + cmake 实现 stm32 标准库开发 (f103)
- VScode如何打造STM32开发环境保姆级教程
- STM32开发之VSCode+GDB下载调试
- 如何使用vscode开发 stc51单片机
- 为VSCode搭建STM32开发环境 零基础教程
- VSCode环境下STM32开发环境搭建指南
- VSCode与JLink极简配置方案,STM32开发指南
- vscode 配置stm32 cpp settings.json
- VScode开发STM32/GD32单片机-MakeFile工程JlinkRTT配置
- 六大全新产品系列推出,MCX A微控制器家族迎来创新
- 意法半导体全新STM32C5系列,重新定义入门级微控制器性能与价值,赋能万千智能设备
- 从控制到系统:TI利用边缘AI重塑嵌入式MCU的边界
- 模组复用与整机重测在SRRC、CCC、CTA/NAL认证中的实践操作指南
- 有源晶振与无源晶振的六大区别详解
- 英飞凌持续巩固全球微控制器市场领导地位
- 使用 Keil Studio for Visual Studio Code开发 STM32 设备
- 蓝牙信道探测技术原理与开发套件实践
- LoRa、LoRaWAN、NB-IoT与4G DTU技术对比及工业无线方案选型分析
- Microchip 推出生产就绪型全栈边缘 AI 解决方案,赋能MCU和MPU实现 智能实时决策
-

【TI MSPM0 应用实战】智能小车+工业角度编码器+血氧仪+烟雾探测器!硬核参考设计详解!
-

2022 Digi-Key KOL 系列: 你见过1GHz主频的单片机吗?Teensy 4.1开发板介绍
-

TI 新一代 C2000™ 微控制器:全方位助力伺服及马达驱动应用
-

MSP430电容触摸技术 - 防水Demo演示
-

直播回放: Microchip Timberwolf™ 音频处理器在线研讨会
-

基于灵动MM32W0系列MCU的指夹血氧仪控制及OTA升级应用方案分享
-
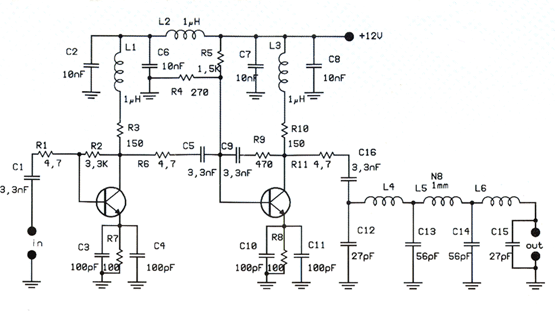
1瓦线性调频增强器
-
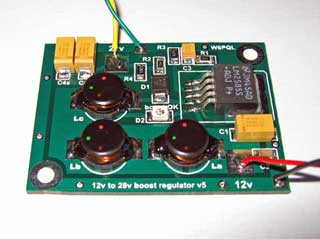
12V 转 28V DC-DC 变换器(基于 LM2585)
-
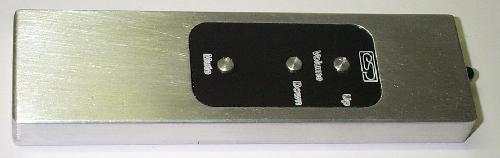
红外遥控音量控制
-
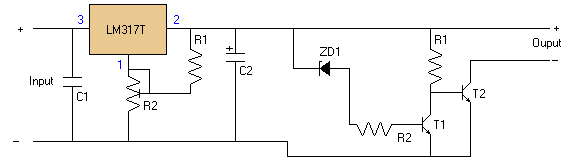
LM317过压保护
-
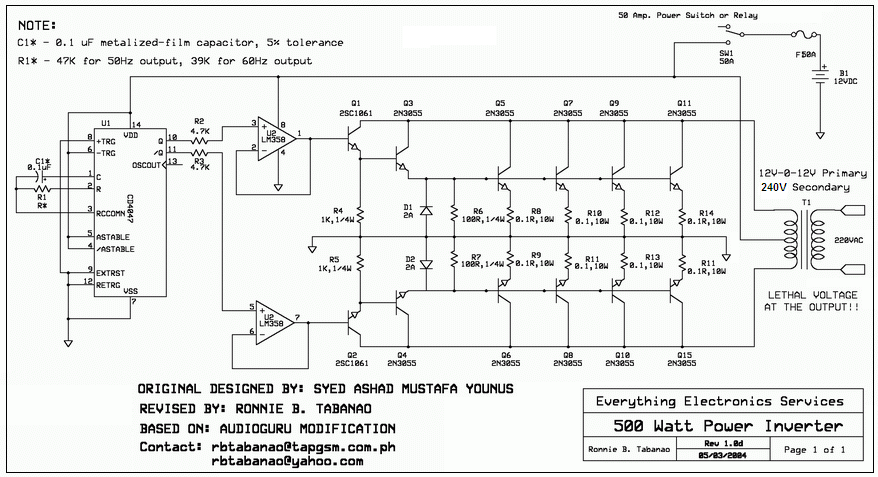
12V转110V/220V 500W逆变器
-
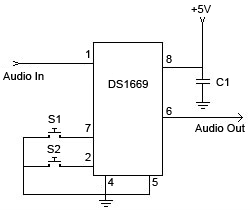
DS1669数字电位器